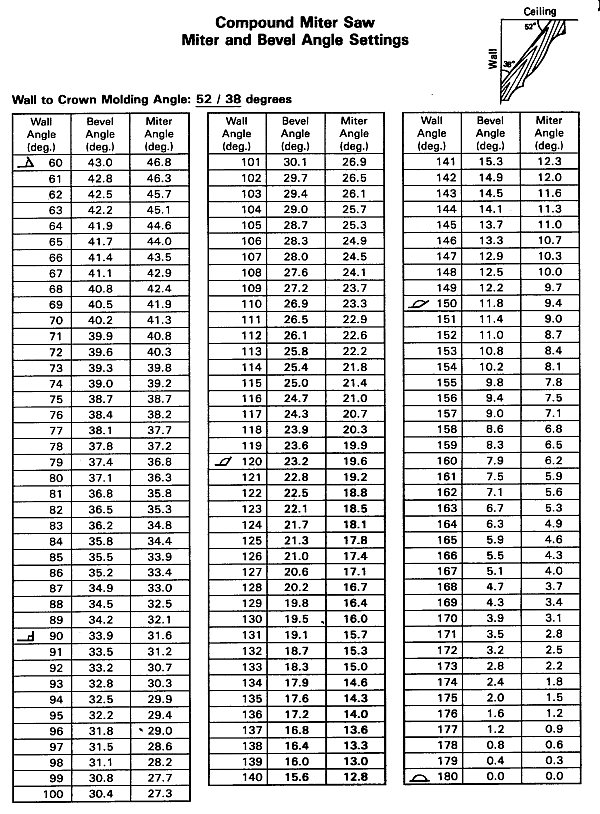


Divide that angle in half (since you want to your crown to meet right in the center of your angle): Step 5: Next you need to set your table saw up. Kreg gives you a cheat sheet right on the jig. Set miter angle to half wall angle. For example: 45 miter for 90 walls. If using a Compound Miter Saw, Set Bevel angle to 0 (No bevel) On an inside corner, the top of the molding will be shorter; on an outside corner, the bottom will be shorter. Fitting crown molding requires a cut at the correct combination of miter angle and bevel angle. The calculation of these angles is affected by two variables: (1) the spring angle (or crown angle, typically sold in 45 degree and 38 degree formats), and (2) the wall angle. This entire website is dedicated to how crown molding is installed understanding crown moulding angles and cutting crown molding. How to install Crown A web site for understanding and cutting the compound angles for Crown Molding and cornice mouldings Find great deals on eBay for crown molding cut angles. The following two chart shows settings are for all U. Standard Crown Molding with 52 and 38 angles, and assume that the angle between the wall is 90. The chart at the end of this article lists the appropriate miterbevel settings for both 5238 and 4545 Ceiling Wall Crown Moldings with anglebetweenwall ranges of. The crown spring angle is the angle between the back of the crown and the wall when the bottom of your crown molding is held firmly on the wall. To obtain your crown spring angle, measure the bottom of your crown as shown in Fig. How to cut an external mitre outside corner on skirting boards baseboards. Spend Time, Save Money, DIY 40, 298 views I purchased the General Crown Molding Jig to cut crown molding for the interior of my house. Upon initial use, I noticed the written instructions are vague and confusing, but I watched a quick online video and was using the tool within a matter of minutes. Inside corners can be cut two ways. You can cut a 45degree corner by holding the bottom edge of the molding (the wall side of the molding) against the bottom back edge of the saw base and back plate, then adjusting the base of the saw to cut at a 45degree angle. In order to properly make miter cuts in crown molding you have to turn it upside down on the miter saw table. This allows the angled back edges to rest against the fence and the table during cutting. Holding the molding in exactly the right position while you make a cut is the difficult part. If youve ever attempted crown molding or had to cut frames for your home, you know how tedious the process is to get the angle right. The Secret to Coping Crown Molding Cut the crown at the same angle as the projection and the cope will fit every time. Coping crown molding is not thought of as a science, but more as an art. It involves a set of skills and techniques passed from master to apprentice, or less formally, from one guy on the job to another. Take a piece of crown molding longer than the front of the cabinet and cut a 45degree angle off one side. Measure and mark the molding with the length of the front piece of baseboard, starting from the deepest part of the 45degree cut. Crown and cove moldings that rest at an angle against the wall and ceiling require a slightly different beveling technique to reveal the profile for coping. Photo 5 shows you how to start the cope. The technique varies slightly depending on the profile of the molding. The True Angle Tool is essential for installing Crown Molding Trim. Do not assume that those corners are 90 Deg. Measure the angle and cut the crown to fit. It is very common in most construction for corners to vary 3 deg. Plus, you can use the Angle Finder to check the spring angle of your crown molding. 10 (254mm) saws will work with crown up to 3 1 2 (89mm) wide, depending on manufacturer. 12 (305mm) saws will work with crown up to 5 1 2 (140mm) wide, depending on manufacturer. Three Methods: The First Cuts The Second Piece Finishing the Job Community QA. Adjust the saw angle back to a 90. Bring the saw down on you measurement mark, leaving yourself a small amount of extra just in case. Most crown molding is going to have to be cut flat on the table. the angles are going to be 52 degrees on the angle, and 38 degrees on the bevel. For your corners, you are going to want to cope them instead of trying to fit these angles. The other way to cut the crown molding it to lay it flat on the table and use the bevel adjustments of the blade to dial in the correct compound miter angles. To cut this way, you need to know the spring angle of the crown molding and the bevel. Mount a piece of crown in the saw (upside down as before), leaving the blade set to the angle used to cut the test scrap. This is the angle you'll use to cut the outside corner. Because the molding is upside down, if the saw blade is swung to the right, you will be cutting the righthalf piece of the joint and you'll need to cut off the right. You cut and inside and outside crown molding corners at the exact same time when you hold the molding in the miter saw the correct way. When you cut the trim that frames windows and doors, you typically put the back of the molding flat on the table of the saw. Understanding why crown molding is a PITA and how to make it NOT is the first step in becoming a Crown Molding Master! OK, maybe not a master but at least have the confidence to try it and do a pretty bang up job of it. There are three common angles for crown molding and about 100 different ways to. A 45degree miter on crown molding meant for a wall that meets at an angle greater than or less than 90 degrees leaves gaps after installing the molding. A couple of tricks makes measuring and. The crown slope angle is measured on a horizontal plane. The crown spring angle is measured on a vertical plane. The first column in the table is the corner angle in degrees. A corner angle of 90 or 270 have the same miter angle and bevel angle cuts. Because crown molding is installed at an angle to the wall, the angle of the molding needs to be taken into account. Detailed charts that specify settings for the saw's bevel angle and miter angle are based on the angles of the walls [source: DEWALT. The CutNCrown system has completely reinvented the crown molding cutting process. The secret is in CutNCrowns unique patented jigs, which are unlike any other crown molding jig in the world. CutNCrown is the only crown molding jig system that makes every cut on the left side of the saw. Introducing a new world patented tool for simplifying angular cuts. Developed, designed and produced in Sweden. If youve ever attempted crown molding or had to cut frames for your home, you know how tedious the process is to get the angle right. To cut the molding at an angle for an inside or outside corner, place it in a miter box upside down and braced against the bottom and side of the box, as if it were angled against a ceiling and wall. This entire website is dedicated to how crown molding is installed understanding crown moulding angles and cutting crown molding. See how to cut crown on flat page for more. Crown molding DIY installing tips Crown moulding materials Crown angle generator Crown moulding angle charts I cut all of my crown molding this way and will never go back to standing it up. A simple method for not making the wrong cut is that the outside corners are always on the right side of the blade. Just move the miter angle to the opposite side and turn the molding around for the other end. This Old House general contractor Tom Silva shares some tricks of the trade for cutting crown molding for miters, scarf joints, and copes. (See below for a shopping list and tools. ) The Ultimate Mitre Box The Ultimate Mitre Box is the most advanced crown molding cutting system in the world. Created with over 30 years of experience by master carpenter Curtis Holyk, it is the ultimate combination of speed, quality, and precision. Onecut helps you find the miter angle for cutting crown molding, see Figure 1. It provides and stores the miter angle, which is the corner angle, divided in half. The cutting angle block (CAblock), shown in Figure 1 with the white arrow, provides this miter angle. Constant practice is necessary in order to cut a crown molding using a miter saw. Nobody expects that you can achieve this process in the first try. You have to experiment with the different cutting angles so that you can get the right cut for your crown molding. The following two chart shows settings are for all U. Standard Crown Molding with 52 and 38 angles, and assume that the angle between the wall is 90. The chart at the end of this article lists the appropriate miterbevel settings for both 5238 and 4545 Ceiling Wall Crown Moldings with anglebetweenwall ranges of. Cutting crown molding can be frustrating and confusing. Inside and outside corners are cut with different settings. Usually the right side of the cut is the left side of the corner. Sometimes you need to flip the crown upside down to cut. Using templates gives you a visual reference for which piece. Determine miter saw angles for crown molding by deciding if you can cut the molding vertically or must use the flat method. Other factors influencing angles include the. Getting the corner miters right on crown molding isn't difficult, but it can be confusing. Generally, you need two 45degree cuts to equal the 90degree angle of a corner, and you need to make sure the cuts are going in the right direction and on the right ends of the wood. Corner joints in crown molding are compound because each cut end has two angles a miter angle and a bevel angle. Compound saws are advantageous because the saw tilts to cut the bevel and rotates to the left or right to cut the miter, making both angles with a single cut. The joints crown molding is referred as compound since the cut on every side usually has two angles. These include the bevel angle and the miter angle. One of the advantages of using a compound miter saw is that you can tilt it to make a bevel angel while rotating. Cut crown molding at a 45degree angle to prepare for coping. Place the molding upside down against the stop blocks. Before you cut, make sure the direction of the miter matches the slash mark. Cut the molding at a 45degree angle. With the molding in the proper position, use a 10inch saw blade to cut a perfect 45degree angle. It is also important here to make sure you cut the molding angle in the right direction: for an inside corner, the bottom of the molding should be longer than the top part of the molding; for an outside corner. The main challenge in installing crown molding or any type of molding is getting the pieces cut to the right length and at the right angle. With crown molding, getting the angle right usually causes the most difficulty. The wider a molding is, the more important angle cutting accuracy. Place the second piece in your miter box or power miter saw as described above and cut the piece at 45 so the edge of the cut is visible from the front. Use a coping saw to cut a slight back angle following the contour of the exposed moulding profile. CutNCrown is how to cut crown molding. Use the solid crown molding jig with an angle finder to discover your crown molding outside corner or inside corner angle. Using our jig you set your saw once half the crown molding corner angle, cut once then once on the back side. With the molding in the proper position, use a 10inch saw blade to cut a perfect 45degree angle. It is also important here to make sure you cut the molding angle in the right direction: for an inside corner, the bottom of the molding should be longer than the top part of the molding; for an outside corner, the top of the molding will be longer than the bottom..